What's new
TerraForums Venus Flytrap, Nepenthes, Drosera and more talk

Register a free account today to become a member! Once signed in, you'll be able to participate on this site by adding your own topics and posts, as well as connect with other members through your own private inbox!

Attempted propagation of small Pinguicula gigantea pieces under "semi-sterile" conditions

  • Thread starter RandyS
  • Start date
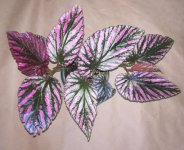
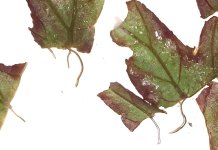
A few years ago I worked a bit on developing an improved technique for propagating small pieces of leaves. I tried mostly Begonias and Gesneriads, although in principle it can be extended to any plant which propagates from leaves or leaf pieces (even succulents!). My initial motivation was that I was trying to propagate a couple Begonias that should have been possible from small cuttings of a leaf, however they failed in my hands. I'll give photos of a couple such difficult Begonias this worked for in the comments. One was Begonia brevirimosa, which is as far as could tell, came along with some sort of pathogen which quickly multiplied, turning the leaf pieces to mush in a couple days. So I decided to sterilize my starting materials and see If that helped. When the technique succeeded, it worked spectacularly--often yielding too many plants. As a test, I pushed it for a Streptocarpus, and got over 300 plants from what originally a small (about 3.7 inch x 2.4 inch) leaf, if I remember correctly. It did fail sometimes, particularly very thin leaves, and plants which simply could not be propagated at all by leaves using conventional techniques. So there's no magic involved, but paying attention to sterility can make a huge difference.

I have no illusions that everything is completely sterile. Nothing was autoclaved, I didn't use a hood, and so on. However, I suspect even the degree of sterility present was enough to give the leaf pieces a chance to callus and start growing plantlets without many pathogens present. The pieces were also kept very moist/wet, and the entire piece could be exposed to light. None of it had to be inserted into soil.

I find the method pretty simple:

1) chop up a leaf
2) put the pieces between paper towels
3) insert paper towel + leaf fragments into a ziploc bag
4) incubate with ~10% bleach (1 to 10 dilution of household bleach)
5) wash with microwaved water about 10 times to eliminate any trace of bleach
6) drain off most remaining water (the contents are still very wet)
7) incubate under lights

If it succeeds, roots and/or plantlets appear in 2 weeks to a couple months. The developing plantlets can be transferred on or into soil at this point. That step has never been a problem.

Here's a long and complicated post I made. Hopefully the figures are helpful...


I've wanted to try other sorts of plants. So I was intrigued to learn that Pinguicula gigantea (and a few other Pinguicula species) can generate new plants from leaf fragments, not just intact leaf pullings. See for example:


I bought a small P. gigantea plant, and it arrived in the mail today. To my surprise, in addition to a nice little plant, the seller included a decent sized leaf. So I decided to try this starting today, far earlier than I expected.

It's possible that this will fail of course. One of my major concerns is that the waxy cuticle on Pinguicula leaves is more porous than that of Begonias, and so the leaves might be destroyed by bleach treatment. I'll find out. It may also fail to give a significant increase in propagated plants over conventional leaf propagation--I don't know. However, this seemed like an obvious first CP to try. I'm thinking perhaps also Drosera regia, and I'm certainly open for any suggestions.

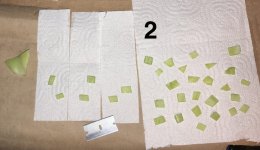
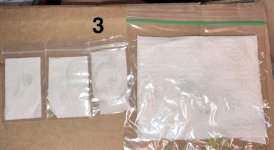
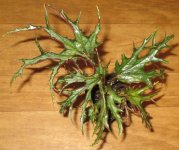
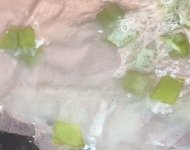
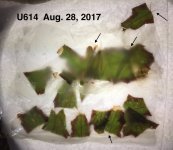
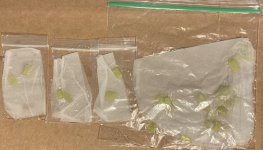
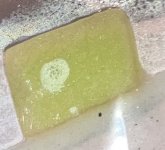
So briefly, I took the Pinguicula gigantea leaf I received. I cut off the lower ~1/3 to save for conventional propagation. The rest I chopped up into about 30 little pieces and laid those on paper towels (photo 2) I saved out 3 sets of two for small ziploc bags, the rest I put in a sandwich sized bag (photo 3). I incubated for a couple minutes with ~10% bleach, and am halfway through doing washes. I'll continue the washes in the morning. After the last wash, I'll drain most of the remaining water, and incubate under lights.

I should know within a couple days whether the bleach fried the leaf pieces. It's often a bit of a balancing act.

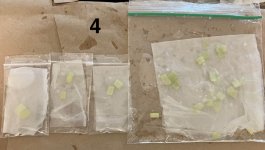
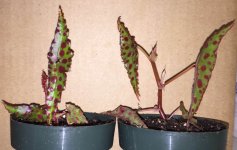
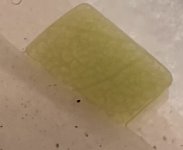
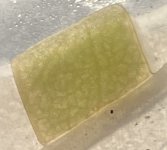
I'll also follow up with a photo of the final washed, drained bags.
 

Attachments

  • IMG_7545.jpg
    IMG_7545.jpg
    117.9 KB · Views: 7
  • IMG_7549.jpg
    IMG_7549.jpg
    101.4 KB · Views: 10
  • IMG_7552.jpg
    IMG_7552.jpg
    96.3 KB · Views: 9
  • Pinguicula gigantea propagation, Step 1.jpg
    Pinguicula gigantea propagation, Step 1.jpg
    206 KB · Views: 10
Last edited:
Here are just a few of the Begonias that the method worked on. I chose examples here that have thin leaves. Begonia U614 was actually the first plant I tried this on. To my surprise, it succeeded on the first try.
 

Attachments

  • Begonia U614.jpg
    Begonia U614.jpg
    49.8 KB · Views: 9
  • Begonia brevirimosa.jpg
    Begonia brevirimosa.jpg
    159.6 KB · Views: 7
  • Begonia amphioxis.jpg
    Begonia amphioxis.jpg
    116.4 KB · Views: 8
Last edited:
Note: the bleach I have is old (at least a year, I think) and it may have degraded somewhat. So it's possible the sterilization step may be less effective. Still I'm going to go with it as is.
 
Here's what they look like after the 9th and final wash, including an overnight wash. Most of the water has been drained out.

It's hard to see things in this sort of a view through two layers of plastic, two layers of paper towels, plus water. I hold these up to a light, and use a magnifier if necessary to get a better look. It's very easy and non-invasive to check on progress. Even small changes are easy to see.

A few pieces often escape the paper towels, leaf pieces are often clumped together, the paper towels shift around a bit, and sometimes leaf pieces even sit in water. None of this seems to matter as far as root/plantlet formation, for other sorts of plants. I would emphasize that the environment inside the bag is wet, not moist.

I don't trust these not to leak so I'm going to put everything into a larger ziploc bag, and put all that under 24 hour lights.

The immediate test is whether they show signs of damage over the next day or two, which is presumably from the bleach step. After that, cuttings are usually pretty stable, and hopefully they will develop roots and plantlets.
 

Attachments

  • Pinguicula gigantea leaf pieces, after final wash.jpg
    Pinguicula gigantea leaf pieces, after final wash.jpg
    133.8 KB · Views: 6
Here's a photo, with a light on the other side, and zoomed in a bit. This should give a better sense as to what the small leaf pieces look like at this stage.
 

Attachments

  • Pinguicula gigantea leaf pieces, zoomed in.jpg
    Pinguicula gigantea leaf pieces, zoomed in.jpg
    135 KB · Views: 6
Here are just a few of the Begonias that the method worked on. I chose examples here that have thin leaves. Begonia U614 was actually the first plant I tried this on. To my surprise, it succeeded on the first try.
To give an idea what can happen, this is the very first time I tried this method, with Begonia U614, showing the first roots after only 11 days, and what they looked like removed from the bag after about a month. Tiny plantlets may be barely visible (?) This was posted on Planet Begonia on Facebook.

After I transferred the leaf pieces to soil, I found that they were pretty stable, and lived on for months. I was able to harvest repeated rounds of plantlets from the rooted pieces. They continued cranking out more, increasing the yield.
 

Attachments

  • Begonia U614 pieces, roots plus developing plantlets, removed after about a month.jpg
    Begonia U614 pieces, roots plus developing plantlets, removed after about a month.jpg
    57.4 KB · Views: 6
  • Begonia U614 Pieces, roots after only 11 days.jpg
    Begonia U614 Pieces, roots after only 11 days.jpg
    111.2 KB · Views: 5
Very interesting! Is the semi-sterile approach for any particular reason VS typical propagation conditions? I didn't see any type of hormones or anything that may cause pathogens to explode as in TC. I'm guessing just a "for good measure" type of idea? Or based on the attempt you had that went mushy quickly you're just trying to avoid that no matter how one off the possibility may have been?
Thanks for taking the time to share your idea and the attempts at it!
If I remember correctly, what I had initially heard was that people were sometimes dipping Begonia leaf fragments in bleach solution, then in water, then placing them on top of a layer of paper towels (say in a tupperware container) or in bags in perlite. But I decided why not push things further, and try sterilizing everything at the beginning? There's no need to take so much space as those sorts of setups either.

I also wanted to see if I could push things into a middle range between conventional propagation and tissue culture (but without media, hormones, etc.). Basically, adopt practices that would make propagation as efficient and clean as possible. I really didn't expect that I could reduce the cutting size so much and get such high yields (sometimes).

There's no reason this has to be limited to leaf cuttings, either. Stem cuttings should work just as well.

I have played around a little bit with doing a bleach neutralization step instead of all the washes after bleach sterilization, and simply drain the excess neutralized solution. The trick I have is to include in the bag an autoclaved eppendorf tube containing sodium thiosulfate. So the inside contents of the eppendorf are sterile (the exterior of the tube is sterilized by the bleach, along with leaves, paper towel, bag, etc.). Assemble everything, add bleach, incubate briefly, then pop the top of the eppendorf and neutralize the bleach. In principle, everything inside is then both sterile and bleach free. Carefully dump any excess solution, seal and incubate.

That approach could also involve including media, hormones or other ingredients in the autoclaved eppendorf tube, pushing it even closer to tissue culture...

One scenario which would be fun is to, say, be able to collect a sample from a new plant in the wild, pop it into the right setup, and get rudimentary tissue culture going even in the middle of nowhere.
 
Last edited:
Update: they appear to look very good after 2 days. In my experience, at this stage, a major hurdle has been passed. If they are (largely) undamaged, they either start to develop new growth reasonably soon (2-8 weeks), or they simply sit there unchanged. There's not much around to hurt them, hopefully. We'll see. I'll try to check them every few days.

It's often helpful to look at these cuttings through transmitted light, as damage is more apparent. The second photo is a leaf piece with a white sheet of paper and a fluorescent light behind it. This is from one of the smaller bags. I assume I'm seeing a network of veins, and that that's normal. Please let me know if it's not... With Begonias, the roots/plantlets tend to form on major veins. Veins here seem to be less prominent, so it will be interesting to see where things happen, if they do.
 

Attachments

  • Pinguicula gigantea 2 days in bags.jpg
    Pinguicula gigantea 2 days in bags.jpg
    119.8 KB · Views: 6
  • Pinguicula leaf piece, two days, transmitted light.jpg
    Pinguicula leaf piece, two days, transmitted light.jpg
    30 KB · Views: 6
  • #10
After nearly 4 days, the cuttings still look good, which is encouraging.

One advantage of this method is that it's very easy to look carefully at their development, without disturbing them at all. Using a small magnifier or taking a picture and zooming in can provide a lot of information.

Since I used a razor blade to generate the cuttings, most edges are initially completely straight. So any deviation can indicate the development of callus, roots, or plantlets.

Here is one of the cuttings, which I believe has all straight edges. So far, there are no changes, but that's what I would expect at 4 days. I'm willing to be surprised though, so it's fun to check.

Here's the cutting seen with a flash.
I believe the feature in the center left is a small air bubble with condensation.
Pinguicula gigantea piece, Feb. 14 .jpg

Or seen with a light behind it. Different features might be visible, depending on how it's illuminated.
Pinguicula gigantea piece, 2 Feb. 14 .jpg

Again, nothing yet, but it's very easy to keep an eye on it.
 

Attachments

  • Pinguicula gigantea piece, Feb. 14 .jpg
    Pinguicula gigantea piece, Feb. 14 .jpg
    70.5 KB · Views: 1
  • Pinguicula gigantea piece, 2 Feb. 14 .jpg
    Pinguicula gigantea piece, 2 Feb. 14 .jpg
    32.5 KB · Views: 1
  • #11
Looks great! I love checking on things too often "just in case". haha
 
  • #12
Looks great! I love checking on things too often "just in case". haha
It can be a bad habit. I tend to dig up cuttings to check on roots, and sometimes even dig up seeds. It can provide crucial information, especially if there's a problem.

At least this is completely non-invasive.
 
  • #13
I wanted to follow up here. The leaf pieces started back in February seem to have essentially dead. However, they declined slowly, lost color, plumpness, etc. Here's what they look like now. I still haven't tossed them, probably soon. Pinguicula gigantea leaf pieces, April 18th.jpg

I'll have to repeat this with fresh material, and importantly, fresh bleach.

The little plant I have is growing and looks great:

PInguicula gigantea plant April 18.jpg

And the "rest" of the big leaf that I chopped up, about 1/3 of the initial leaf, is producing plantlet(s) using conventional propagation (on moist sphagnum).

PInguicula gigantea plantlet(s) April 18.jpg


I'm curious what the two features indicated by arrows are. Will they become plantlets?

(The glandular hairs on the small plantlet are very cool!)

PInguicula gigantea plantlet(s) April 18 zoom.jpg

If those will become plantlets, the way that they just "appear" on the leaf, but near the proximal end, makes me wonder what's going on here. They don't appear to be arising from an obvious structure. Is there some sort of gradient of a hormone in the leaf? Can this be mimicked by applying something (IBA, keiki paste?). I'm really curious if anyone has any insights.
 
Back
Top